
When you visit the dentist for a restorative procedure—whether it is a simple filling, a new crown, or repairing a chipped tooth—you expect to leave the clinic with a fully functional, pain-free smile. However, dental work is an intricate mix of biology, engineering, and art. Fixing the aesthetic appearance and sealing a cavity is only half the battle. The other, arguably more critical half, is ensuring that the repaired tooth perfectly aligns with the rest of your mouth.
If you have recently watched viral dental education videos, you might have seen a dentist highlighting a specific, non-negotiable step in the tooth restoration process: using a small strip of green or blue paper to check your bite. As the expert in the video notes, if a dentist skips this step, your newly fixed tooth might just keep breaking.
This comprehensive guide delves into the science of your bite, the purpose of that colored paper (known as articulating paper), and why proper occlusal adjustment is the ultimate key to the longevity of your dental health.
What is Articulating Paper?
That seemingly simple piece of colored paper your dentist asks you to “tap, tap, tap” and “grind side to side” on is known in the dental field as articulating paper.
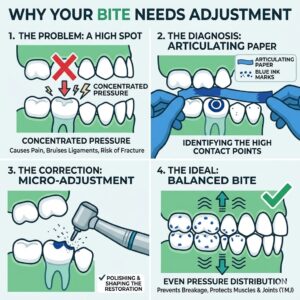
Articulating paper is an ultra-thin, diagnostic tool coated with a highly sensitive dye—most commonly blue or red. When you bite down on it, the pressure of your teeth grinding together transfers the ink from the paper directly onto the biting surfaces (the occlusal surfaces) of your teeth.
How It Works
-
Targeted Marking: The paper leaves a colored mark strictly on the areas where your upper and lower teeth make contact.
-
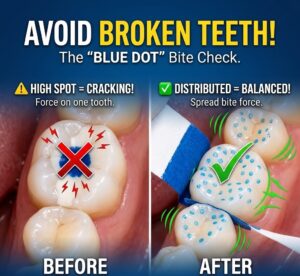
Pressure Indication: The size and darkness of the ink dots correspond directly to the intensity of the bite force. A tiny, faint dot indicates a light, healthy touch. A large, dark “bullseye” mark indicates a high spot where the teeth are hitting each other with excessive pressure.
-
Precision Tool: Advanced articulating papers are incredibly thin—sometimes measuring only a few microns thick—ensuring that even the most microscopic discrepancies in a patient’s bite are highlighted for the dentist to see.
The Mechanics of Your Bite: Understanding Occlusal Force
To understand why articulating paper is so crucial, you must first understand the sheer power of the human jaw. The muscles of mastication (the muscles used for chewing) are some of the strongest in the human body relative to their size. When you bite down, your jaw can exert anywhere from 150 to 200 pounds of force.
The Importance of Force Distribution
In a healthy, properly aligned mouth, this immense pressure is distributed evenly across all of your teeth. Your molars and premolars are designed with specific cusps (the pointy parts) and grooves (the valleys) that lock together like interlocking gears.
When your bite force is spread evenly, no single tooth takes the brunt of the pressure. However, when a dentist places a new filling or crown, they are introducing a foreign material into this perfectly balanced ecosystem. Even if the new filling is just a fraction of a millimeter too high, the intricate balance is immediately destroyed.
Instead of the bite force being absorbed by all of your teeth harmoniously, that single “high” tooth takes the entire 200 pounds of pressure every time your jaw closes.
The Danger of a “High Bite”
If a dentist fails to properly use articulating paper to check and adjust your bite, you are left with what is medically known as a “high restoration” or a “high bite.” Leaving a dental clinic with a bite that has not been properly leveled can lead to a cascade of painful and expensive dental issues.
1. Continuous Breakage and Fractures
As highlighted in recent expert dental videos, the most immediate risk of a high bite is structural failure. Dental restorative materials—such as composite resin, amalgam, or porcelain—are highly durable, but they are not indestructible. If a newly repaired tooth is hitting its opposing tooth before any of the other teeth touch, it acts like a hammer striking an anvil. Over a short period, this intense, isolated pressure will cause the new filling to crack, chip, or completely shatter. Worse, the opposing natural tooth can also suffer micro-fractures or break under the strain.
2. Severe Tooth Sensitivity and Pain
Underneath the hard enamel of your tooth lies a living nerve. Surrounding the root of your tooth is the periodontal ligament, which acts like a microscopic shock absorber holding the tooth in the jawbone. When a tooth is subjected to the premature, heavy trauma of a high bite, the periodontal ligament becomes severely bruised and inflamed. This manifests as intense pain when chewing and hypersensitivity to hot and cold temperatures. Patients often mistake this pain for a failed root canal or a deep infection, when in reality, it is simply a bruised ligament caused by an uneven bite.
3. TMJ Disorders and Jaw Pain
Your temporomandibular joint (TMJ) is the hinge that connects your jaw to your skull. When your bite is misaligned due to a high filling, your jaw muscles will subconsciously try to shift your jaw into a new position to avoid hitting the painful high spot. This unnatural shifting strains the jaw muscles and the TMJ. Over time, this can lead to chronic headaches, neck pain, jaw clicking, and muscle spasms—a condition broadly categorized as Temporomandibular Joint Disorder (TMD).
The Step-by-Step Process: How Dentists Check Your Bite
Ensuring a perfect bite is a meticulous process. When you visit a high-quality dental clinic, you should expect your dentist to follow a rigorous protocol to ensure your bite is balanced.
-
Placement of the Restoration: The dentist removes the decay, cleans the tooth, and places the filling, crown, or veneer.
-
Initial Shaping: The dentist uses a high-speed drill to shape the material so it visually matches the natural contours of the tooth.
-
The Articulating Paper Test: The dentist dries the teeth (as saliva can prevent the ink from transferring) and places the colored paper over the lower teeth.
-
Biting and Grinding: You will be instructed to tap your teeth together naturally. Then, you will be asked to grind your teeth side to side and forward and backward. This mimics the natural movements of chewing.
-
Analyzing the Marks: The dentist removes the paper and inspects the teeth. They are looking for the dark blue or red marks that indicate heavy, premature contact.
-
Micro-Adjustments: Using a fine polishing burr, the dentist gently shaves away the colored marks on the restorative material, taking away microns of material at a time.
-
Repetition: The dentist will wipe the teeth clean and repeat steps 3 through 6. This process is repeated until the marks on the newly repaired tooth perfectly match the light marks on the surrounding natural teeth, proving that the bite force is evenly spread.
Procedures That Absolutely Require Articulating Paper
While commonly associated with cavity fillings, bite adjustment is a mandatory step in almost every restorative and prosthetic dental procedure.
-
Composite Fillings: Because resin is placed soft and hardened with a light, it often requires significant shaping and bite adjustment once cured.
-
Dental Crowns: A crown covers the entire biting surface of a tooth. If the laboratory manufactures the crown even slightly too thick, it must be adjusted in the mouth before permanent cementation.
-
Veneers: While veneers are on the front of the teeth, adjusting the way the front teeth slide against each other (anterior guidance) is crucial to prevent the veneers from popping off.
-
Dental Bridges and Implants: Missing teeth replaced by artificial ones must be meticulously balanced to ensure the titanium implant screw or the supporting bridge teeth are not overloaded with bite force.
-
Night Guards and Retainers: Even removable appliances must be checked with articulating paper to ensure they do not accidentally shift the jaw into a painful position during sleep.
Patient Empowerment: Advocating for Your Dental Health
Understanding the science behind articulating paper empowers you to take control of your dental health. Dental visits can be intimidating, and when your mouth is numb from local anesthesia, it can be incredibly difficult to tell if your bite feels “normal.”
Here are a few proactive steps you can take to protect your teeth:
-
Pay Attention After the Numbness Fades: Once the local anesthetic wears off (usually 2 to 4 hours after your appointment), pay close attention to how your teeth fit together. When you close your mouth and swallow, all your teeth should hit simultaneously. If you feel one specific tooth hitting first, your bite is off.
-
Do Not “Wait to Get Used to It”: A common misconception is that a new filling will simply “wear down” over time or that you just need to get used to the feeling. While minor adjustments happen, a significantly high filling will not wear down fast enough to prevent bruising the tooth ligament.
-
Call Your Dentist: If you experience sharp pain when biting down a few days after a procedure, do not suffer in silence. Call your dentist and ask for a bite adjustment. This is a standard, quick, and usually painless 5-minute appointment that requires no numbing shots. The dentist will simply use the articulating paper and polish away the high spot, providing almost instant relief.
Conclusion
The next time you are sitting in the dental chair and the dentist asks you to bite down on a piece of blue or green paper, you will know exactly what is happening behind the scenes. That simple strip of articulating paper is the frontline defense against broken restorations, severe tooth pain, and jaw joint disorders.
By ensuring that your bite force is harmoniously spread across all your teeth, your dentist is not just fixing a cavity; they are structurally engineering your smile to last a lifetime. Never underestimate the importance of a properly aligned bite, and never hesitate to advocate for an adjustment if your teeth don’t feel perfectly balanced. Your comfort, and the longevity of your dental work, depend on it.